


typecho函数
(共5篇)
搜索到
5
篇与
typecho函数
的结果
-
『笔记』『学习』Typecho常量 Typecho常量,在 `config.inc.php` 最后面插入一行代码就可以启动一些功能或者重新定义一些参数,在 `config.inc.php` 中加是全局生效的,不在 `config.inc.php` 中其实也可以生效,只是在你加的位置那个局部生效。 ## debug模式 平时不建议开启,遇到报错或者开发东西时最好开启,可以看到更详细的报错 ```php define('__TYPECHO_DEBUG__', true); ``` ## 强制https 当你用https的时候typecho会自动识别的,但是因为大家的环境千差万别,会有识别错误的情况,比如你https都布置好了,但是程序依旧只会加载http的,所以该常量的作用就是强制程序使用https,解决识别错误的情况。 ```php define('__TYPECHO_SECUER__', true); ``` ## 公共头像地址替换 Typecho用的GRAVATR的公共头像地址,GRAVATR的服务器在美国,虽然它在全世界做镜像,但是在国内依旧很慢。然后发现有国内有很多人为其做反向代理,把头像缓存到本地,来提高速度,以前大家可能会使用插件来替换Typecho的GRAVATR的默认地址,实际上不需要,我们用这个常量就可以了,比如我们替换成 `https://gravatar.cat.net/avatar/` ,用法如下 用法 在config.inc.php最后面插入 `define('__TYPECHO_GRAVATR_PREFIX__', 'https://gravatar.cat.net/avatar'); ` 这样一来typecho就会替换成 `https://gravatar.cat.net/avatar/` 渠道的头像地址。【有些模板可能不支持】 ## 后台路径自定义 后台路径字定义,用于修改程序后台地址,提高安全性。 typecho默认后台地址是admin,如果我们想改成typecho-admin,那么首先登陆服务器把admin文件夹名字改成typecho-admin。 然后在config.inc.php找到define('__TYPECHO_ADMIN_DIR__', '/admin/');将其中的admin改成typecho-admin即可。 ## 自定义上传附件目录 可以单独定义一个不在typecho下的附件上传地址 存储到这里有什么用呢? 在config.inc.php最后面插入 ```php define('__TYPECHO_UPLOAD_DIR__', '/www/static'); define('__TYPECHO_UPLOAD_URL__', 'https://xxxxx.upyun.com'); ``` ## 开启动态域名 如果你站绑定了多个域名,可能非后台设置的域名访问会出现跨域加载问题,可以使用他开启动态域名,这样就可以使用多个域名绑定在同一个站点了 ```php define('__TYPECHO_DYNAMIC_SITE_URL__',true); ```

-
-
『原创』『教程』首页及文章页滚动广告栏 > ## 前言 因为之前在很多网站上都能看到广告,虽然但是,这对很多博主来说也是一笔额外的收入,我一直是入不敷出!:@(吐血倒地) 然后我看到了执念博客的首页广告栏,虽然曝光确实大,但是用户体验极其不好,因为要翻很多广告才能翻到文章,就像这样:  所以我就想到了滚动广告,一个广告的位置,能够显示多条广告 > ## 成果展示 {tabs} {tabs-pane label="首页"}  {/tabs-pane} {tabs-pane label="文章页"}  {/tabs-pane} {/tabs} > ## 教程开始 灵感及相关代码来自于Joe主题的首页轮播图 ### 一、添加后台 打开 `functions.php` 添加以下代码 {tabs} {tabs-pane label="代码"} ```php $JADPost = new Typecho_Widget_Helper_Form_Element_Textarea( 'JADPost', NULL, NULL, '文章页顶部广告', '介绍:用于设置文章页顶部广告 格式:广告图片 || 跳转链接 (中间使用两个竖杠分隔) 注意:如果您只想显示图片不想跳转,可填写:广告图片 || javascript:void(0) 其他:一行一个,一行代表一个轮播广告图' ); $JADPost->setAttribute('class', 'joe_content joe_post'); $form->addInput($JADPost); ``` {/tabs-pane} {tabs-pane label="代码位置"} 因为有位小伙伴放错了位置,所以再贴一张图 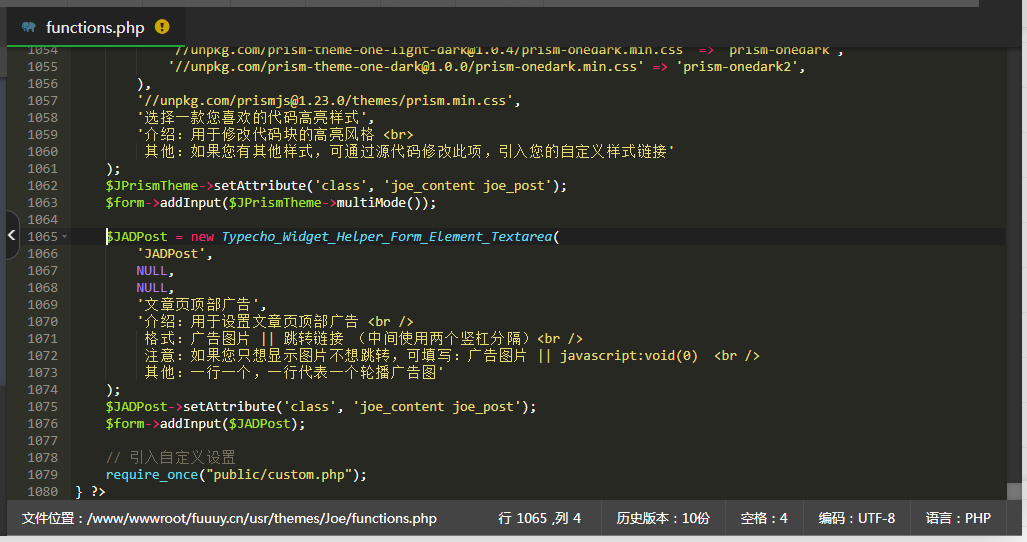 {/tabs-pane} {/tabs} 这是文章页的代码,因为首页广告主题自带了 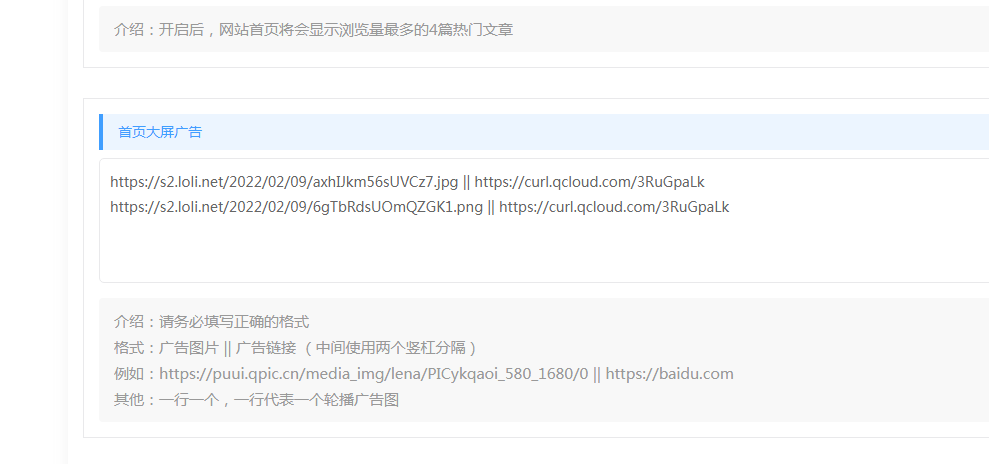 ### 二、添加滚动广告栏 {tabs} {tabs-pane label="首页"} 因为首页已经有广告位了,所以直接替换就行了 将主题 `index.php` 的以下代码直接替换为新代码 {collapse} {collapse-item label="代码位置" open} 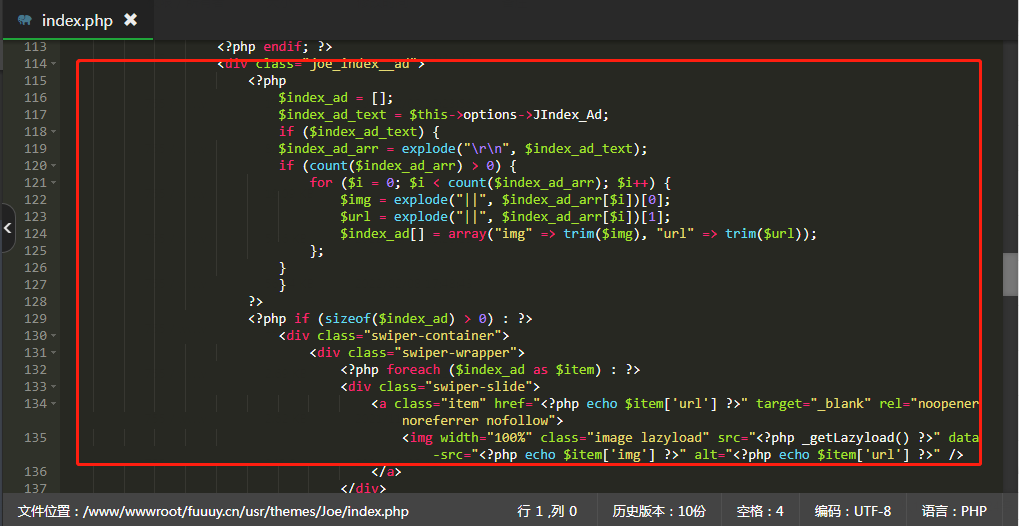 {/collapse-item} {collapse-item label="新代码" open} {hide} ```php
-
『转载』『代码』Typecho自定义调用如热门文章随机文章等 > Typecho自定义调用 这是面向模板开发者的一篇干货文章,通过学习下面的两个事例,你可以通过调整数据库语句来实现自定义调用文章,如随机文章等。 > 调用热门文章 在 `functions.php` 中加入如下代码 ```php class Widget_Post_hot extends Widget_Abstract_Contents { public function __construct($request, $response, $params = NULL) { parent::__construct($request, $response, $params); $this->parameter->setDefault(array('pageSize' => $this->options->commentsListSize, 'parentId' => 0, 'ignoreAuthor' => false)); } public function execute() { $select = $this->select()->from('table.contents') ->where("table.contents.password IS NULL OR table.contents.password = ''") ->where('table.contents.status = ?','publish') ->where('table.contents.created
-
『笔记』『代码』Typecho 主题模版制作常用调用变量和函数、参数 > 前言 博主对Typecho博客程序情有独钟,但是还不会PHP所以四处收集Typecho制作模板的代码和函数什么的。 一个是方便自己使用,另外一个方便大家查看,又找到了点代码,今天发一下。 修改 Typecho 主题时,需要判断当前用户角色,对于管理员角色,显示内容,可使用如下: ```php 若为管理员,显示此区域内容 //else可去 非管理员,显示此区域内容 ``` 登录 ```php ``` 注册 ```php ``` 站点名称 ```php ``` 域名地址 ```php ``` 后台地址 ```php ``` 完整路径标题,比如 文章 站点 ```php ``` 站点说明 ```php ``` 模版文件夹地址 ```php ``` 作者名字 ```php ``` 当前登陆用户名字 ```php ``` 退出链接 ```php ``` 作者头像 ```php ``` ` 参数说明` `此函数是完整 img 标签,200代表长和宽` 该文作者全部文章列表链接 ```php ``` 该文作者个人主页链接 ```php ``` 该文作者的邮箱地址 ```php ``` 引用模版文件夹内php文件 ```php ``` ` 参数说明` ` 可以使用相对路径获取上级目录php文件` 评论 ```php ``` 常用调用代码: ```php /*头部HEAD常用 //关键词 //站点名称 //站点描述 //标题 //模板路径 //主页网址 //分页 //版本号 /*文章页面常用 //标题 //分类 //标签 //时间 //内容 //上一篇 //下一篇 ``` 调用作者信息: ```php //作者名称 //作者文章列表连接 //作者主页 //作者邮箱 //作者头像 ``` 评论者信息: ```php //带连接的作者名 //不带连接的作者名 ```